
How to Create Ad Campaigns in Facebook
There’s a darn good chance that the majority of your ideal target audience is on Facebook. Facebook boasts a member base of 1.4 billion people, 900 million of which visit the networking site every single day. Through its extremely specific targeting options, you can quickly and easily get your fitness business’s name in front of the right people in your surrounding neighborhood through Facebook ads.
We’ve talked a little bit about Facebook advertising over the past several weeks. If you have never run ads on Facebook, I highly recommend that you begin by boosting posts on your page. This will allow you to better understand how their advertising platform works, the targeting options available and the types of results you can expect to see without spending a ton of money. Once you’ve promoted some posts, you’re ready to fully dive into the world of Facebook advertising by creating your own campaign.
To create your campaign, we recommend using the Ads Manager, which is suited for the majority of advertisers (there’s another option, called the Power Editor, which is more appropriate for large companies running multiple campaigns). The Ads Manager makes it easy for novice advertisers to create objective-focused campaigns.
Step 1: Determine Your Campaign’s Objective
Every ad campaign that you run, whether it will be on Google AdWords or Facebook, needs to have an objective. I would also argue that every ad needs to initiate a specific action from those who click on the ad. If you need more members at your business, your ads should be focused on getting users to sign up for a free intro class or weekend bootcamp session. You should never run an ad that does not have a call-to-action encouraging users to take a specific action after they’ve clicked on the ad.
Facebook provides advertisers with a choice of 10 different objectives. If you want to run effective, action-oriented ads (that will likely drive a higher ROI), I highly recommend that you spend your money on the following objectives: increasing conversions on your website, raising attendance at your event or getting people to claim your offer. These objectives will enable you to see tangible results for your business, rather than simply running ads to help increase awareness. You may say that just want people to hear about your business, but don’t you really want them to attend a class with the intent of becoming a member or student?
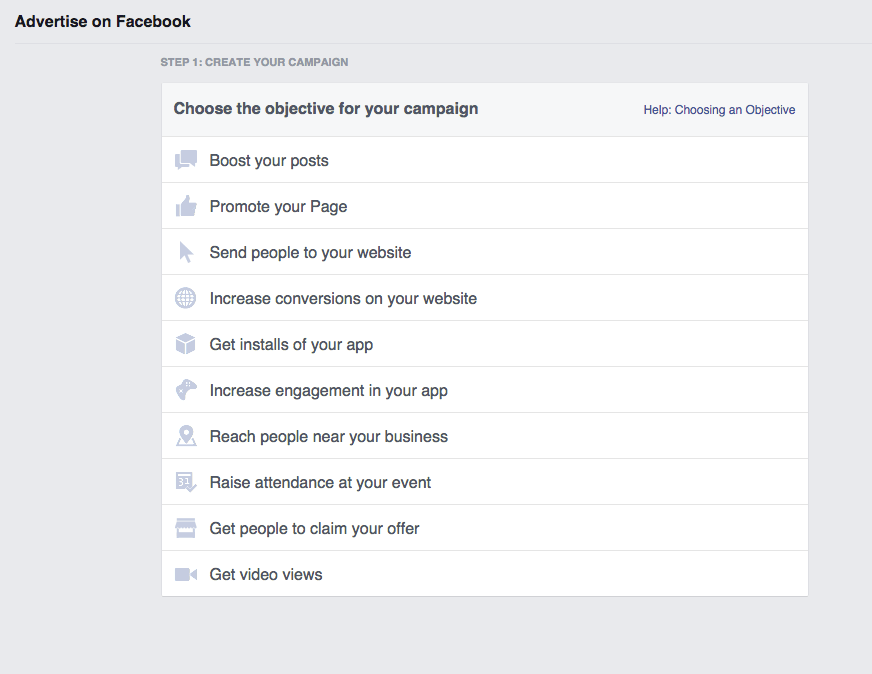
For this example, we’ll focus on developing an ad that will increase conversions on your website. This is a great option to choose if you would like to get new prospects to check out your gym. You can promote the following types of offers to increase conversions on your site:
- Sign up for a free introduction class
- Reserve a spot in a free weekend bootcamp class
- Download a free healthy meal or workout plan
- Join an upcoming fitness challenge
To run an ad, you must have an offer to promote. To truly be able to determine the effectiveness of that ad, the offer should “live” behind a form, meaning that the only way a web visitor can get the offer would be to fill out the form. Form submissions (which just means how many people fill out the form and then click on “submit”) would be the conversion that you are tracking. This will enable you to determine how many form submissions (i.e. potential new customers) you received from your ad spend.
Step 2: Choose Where You Want to Send Visitors
Once you’ve selected your objective, you’ll need to plug in the URL for the page on your website that you want your ads to drive visitors to. We highly recommend that you add tracking to these URLs so you can see how visitors from these ads are interacting with your site.
To create a tracking URL, I recommend that you use the Raventool’s free Google Analytics URL Builder. This tool is extremely easy to use. Simply plug in your destination URL and type in “facebook” as the Campaign Source (where your ads are living). For the Campaign Medium, enter “ad” or “display ad” so you know these visitors are from paid placements. Finally, if you’re running more than one campaign on Facebook, it’s beneficial to give the campaign a name. If you’re promoting a free class, enter something along the lines of “free intro class” in the Campaign Name section. You can leave the last two fields blank.
After entering information in the first three fields, you will see your new trackable URL listed in the box at the bottom of the page. Note that the “%20” is used to separate words that you’ve added to your URL and “&utm_” breaks up the different sections of your URL (it separates the Campaign Source, Campaign Medium and Campaign Name).
![]()
3. Select Your Audience
As mentioned earlier, Facebook offers amazing targeting options for fitness business owners. You can target based on the following categories:
- Location
- Age
- Gender
- Language
- Relationship
- Education
- Work
- Financial
- Home
- Ethnic Affinity
- Generation
- Parents
- Politics (U.S. only)
- Life Events
- Interests
- Behaviors
- Connections
We recommend that you setup very specific location targeting. The best option for location targeting? Enter your business’s address, then click on the mileage drop down and click the word “Custom.” Analyze your current members’ addresses to determine the length people will likely drive from their house to your gym and enter that distance. For more tips on targeting, check out our previous Facebook Advertising blog post.
4. Set Your Budget
Facebook offers two different options for campaign budgeting. You can choose to go with a daily budget. The daily budget option is ideal if you want your ads to run all day long. Setting this budget will help Facebook pace your spend so the ads will stay live throughout the day. The other option is setting a lifetime budget for your campaign. If you’re running a promotion for a limited time, this is the option you want to use. With the lifetime budget option, Facebook will pace your spend over the specific time period you’ve selected. This is also a good option if you have a limited budget and want to make sure that you do not overspend.
In this section you can also set start and end dates (you can pause ads at any point in time, so setting dates is not required). You can also select settings to only have your ads run during certain times of the day.
The final thing to note in this section is ad delivery. You are given two different options: standard and accelerated. I recommend that you choose standard delivery, which will enable Facebook to deliver your ads throughout the day. Choosing accelerated will cause your campaign to quickly spend through the budget, meaning they’ll only be visible for a small portion of the day.
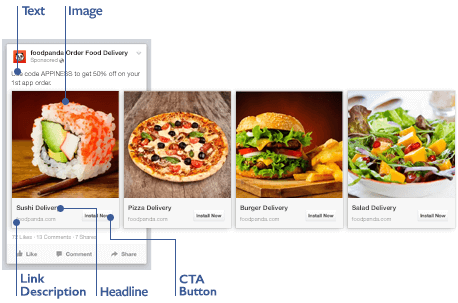
5. Develop Ads
Facebook offers two different ad formats: links and carousels. Link ads display a single image, while carousel ads consist of three to five smaller images.
Link Ad Tips
Link ads display one image, with a headline, body copy, news feed description (optional) and call-to-action button (option). Here’s what you need to know about each component:
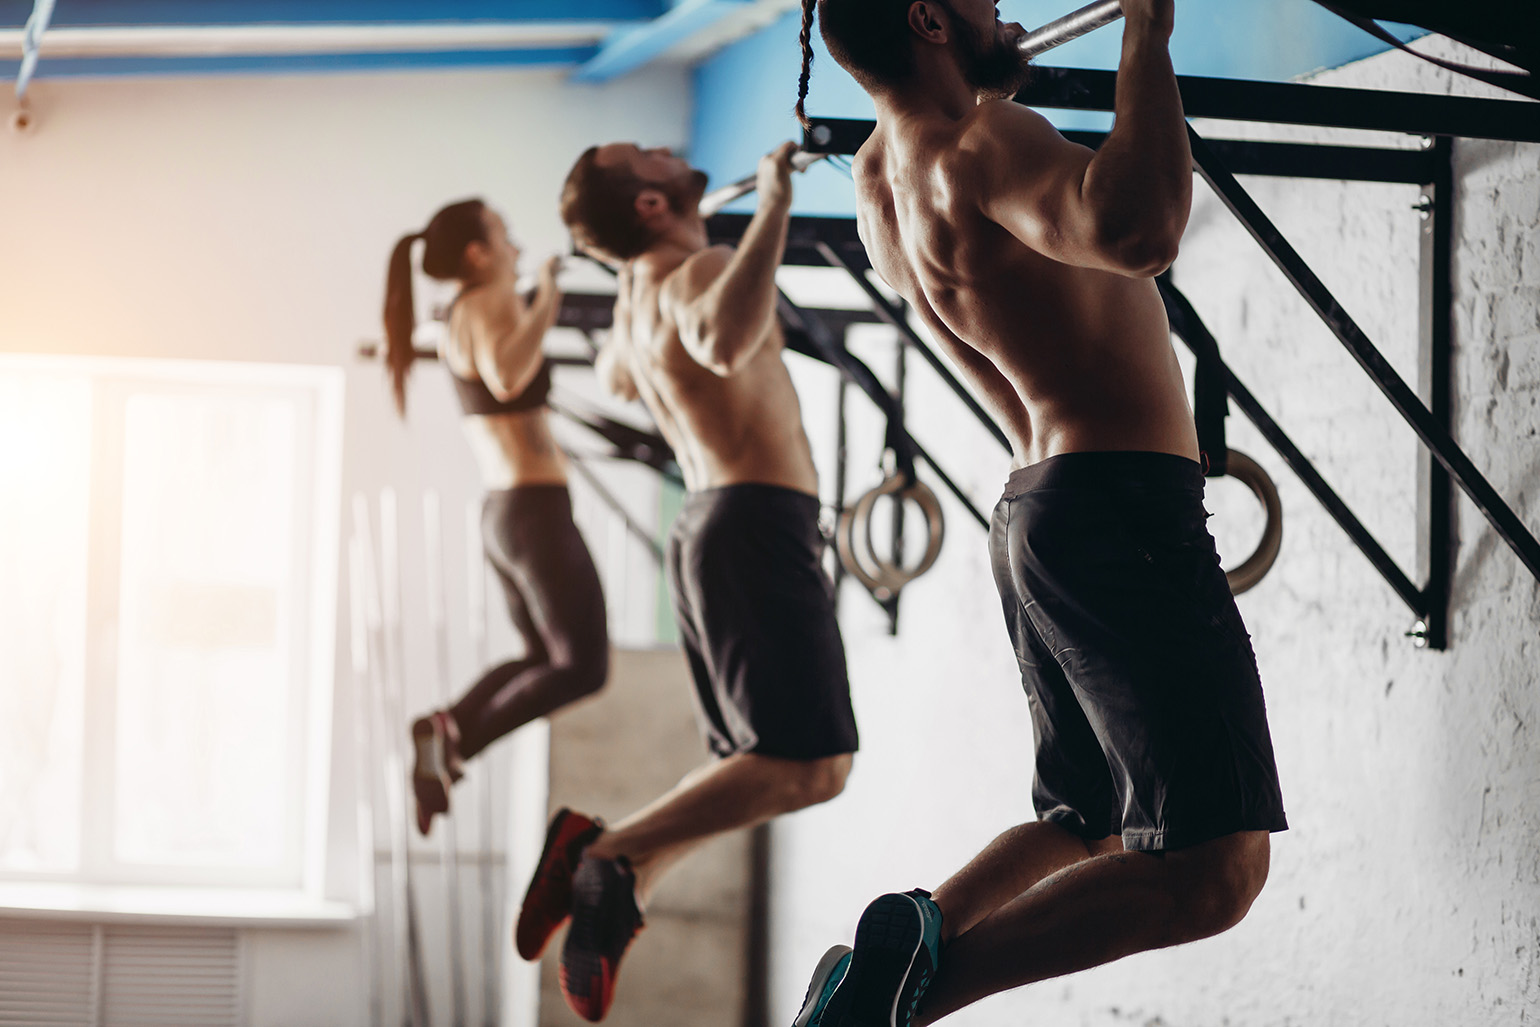
- Image: The recommended size for this image is 1200×628 pixels. You can use stock images or images of your members in action (as long as they don’t look blurry or grainy). Limit the amount of text used in the image as Facebook will disapprove ads with more than 20% text. There are several tools you can use to test your image if you’re worried it may contain too much text.
- Headline: This is restricted to 25 characters, so it needs to be short and attention grabbing. This is bolded when displayed in the ad.
- Body Copy (Text): This section is limited to 90 characters and will appear in full on every different ad placement (news feed, mobile news feed and desktop right column). Try adding a short question here or a quick overview of your offer.
- News Feed Link Description: This optional section provides you with a lengthy 200-character space to better describe your gym and offer. This will appear in full below your image in the news feed placement. Note that this section will be cut off in the other ad placements (mobile news feed and desktop right column).
- Call-to-Action Button: This optional button is a great way to draw attention to your ad and to get users to take a specific action after clicking. The options include: Download, Shop Now, Book Now, Learn More, Sign Up and Watch More.
Carousel Ad Tips
Share between three to five images, each with its own short headline using Facebook’s carousel ad option. Here’s what you need to know about this advertising option:
- Images: Include between three to five different images to be displayed in this type of ad. This is a great option to choose if you offer different types of classes as you could feature images of each different class in this ad.
- These images should be 600×600 pixels, and again, are limited to 20% text.
- Headline: Each image has its own 40 character headline. This should be attention grabbing and relevant to the image used.
- Description: This optional feature provides you with 20 additional characters to provide another short call-out with each image.
- End Slide: By checking this box, Facebook will automatically add an end place card that includes your page’s profile picture and a link to your site.
- Call-to-Action Button: You can add the optional call-to-action button to your carousel ads, however, I recommend against doing this. When you add this button, your short titles and descriptions will be cut off, making them essentially useless.
After you choose your ad type, upload your images and write your headline and descriptions, you’ll be given the option to choose where you want your ads to be displayed. The placement options include:
- Desktop news feed
- Mobile news feed
- Desktop right column
- Audience network
If you do not make any changes to this section, your ad will run on all four placements. I highly recommend that you don’t run on the audience network, as it typically produces the lowest conversion and click rates. Monitor your reports over time to determine which placements tend to result in the highest conversion rates for your ads.
Now you have have all of the information needed to setup and run an ad campaign in Facebook. In our next post, we’ll provide tips on how to optimize your ads when they’re not performing as well as expected. Stay tuned!
If you’re looking for additional marketing tips in the meantime, check out our 10 Step Marketing Guide. This informative webinar covers important digital marketing tactics, such as SEO, PPC and local search. Download it for free today to get great advice for expanding your marketing strategy!

I’m Coach Kelli, a devoted CrossFit gym owner with 15 years of experience managing my facility, along with owning yoga studios and wellness centers. Beyond the fitness world, I have a passion for cooking, cherish moments with my children and family, and find joy in spending time outside. Having experienced the highs and lows, I’m dedicated to leveraging my expertise to help you grow and succeed on your fitness journey.
About the Author: Kelli Sweeting


I’m Coach Kelli, a devoted CrossFit gym owner with 15 years of experience managing my facility, along with owning yoga studios and wellness centers. Beyond the fitness world, I have a passion for cooking, cherish moments with my children and family, and find joy in spending time outside. Having experienced the highs and lows, I’m dedicated to leveraging my expertise to help you grow and succeed on your fitness journey.